More photos of the quilt

Now coming out the other side of the quilt madness which was last week and the week before. Lots of late nights and baby’s nap times frantically finishing off. What a relief to have it finished. I handed it over to my niece, Esmé, and my brother’s promised me a photo of her using it for a teddy bear’s picnic. Watch this space.

Here’s some pictures I took of it on Saturday morning before it went off to its new home. And after it survived its first wash in the washing machine.

IMG_0497.JPG

IMG_0492.JPG

IMG_0493.JPG

IMG_0496.JPG

IMG_0495.JPG

The day that I thought would never come.

After starting the quilt in January 2013, I’ve finished it. Finally!

I’ve watched more TV today – whilst slip-stitching the back binding – than I have in weeks. So there’s a perk. The skin on one of my fingers cracked under the pressure last night, leaving specks of blood on the quilt. Having tried a plaster today which worked for all of two seconds, I brought out the big guns.

IMG_0490.JPG

Before I would allow myself to pick up the quilt, I had some other craft to attend to. Remember those baby shoes I made? Well today I met said baby. But first, the shoes needed ribbon adding. Having not read the instructions all the way to the end, I realised that I could’ve added the ribbon when sewing the shoes, tucked into the seam. Never mind. Then I saw mention of adding ribbon using buttonholes. I was tempted. Might it be neater than my handsewing? So I dug out my sewing machine’s instruction manual and gave it a go. So much simpler than I thought. So I’ve learnt a new skill!

First buttonhole.

IMG_0482.JPG

Second one was better.

IMG_0484-0.JPG

It was at this point that I realised that the buttonholes should’ve been vertical, not horizontal. Oh well, in for a penny, in for a pound. Here’s what they look like with ribbon.

IMG_0486.JPG

IMG_0487.JPG

All wrapped and ready for baby Bethany.

IMG_0488.JPG

Back to the quilt. Hours of slip-stitching later, the binding was done. Next all I needed to do was to trim the loose threads on the backing from the quilting. I then noticed one of the stars wasn’t quite complete, so back under the sewing machine it went.

Here’s the finished (!!!!) article.

IMG_0491.JPG

However, it may not look like that anymore. I’ve done a crazy thing and put it in the washing machine. On a delicate wash with hand wash, but still, I’m staying up anxiously awaiting the outcome. The cycle has finished and it looks in tact, so I’ve put it on a slow spin as it’s saturated. Think it will be travelling with us in a damp state tomorrow … Eeek. Why’ve I washed it? Well, where I’d marked on the stars, etc., for quilting and then tried to wash the pen off, the blue has run in places. Also, some mysterious black marks appeared when I was quilting. I think it could be the spraybaste gumming up the machine. I couldn’t bear to hand over a ‘dirty’ quilt, so, as usual, impatience has got the better of me. Before thinking too long about it, it went in the wash. Please please please, let it survive.

UPDATE: It appears to have survived.

Will this ever end/What a bind

Throwing in the towel for the night. I’ve slip-stitched less than a quarter of the binding and it’s taken hours. Will resume tomorrow when the light’s better and hopefully I’ll speed up.

This afternoon, during nap time (when else?), I attached the binding to my quilt and mitred the corners as I went.

IMG_0478.JPG

IMG_0479.JPG

After that, I had to do a lot of unpicking where you could see the seam I’d done round the edge when trying to see if the quilt was square before trimming it.

Tonight, I’ve begun slip-stitching the binding to the backing. Not as quick as I thought it’d be.

IMG_0480.JPG

I’ve forgone the gym in the hope I’d finish tonight but no such luck. Tomorrow is d-day then, which is a shame as I was hoping to wash it before the weekend – which is when I’m hoping to hand it over.

Here’s how it’s looking.

IMG_0481.JPG

The end is in sight

I was hoping to be all done today, but haven’t achieved that. Maybe tomorrow.

I started by using a damp cloth to remove the fabric marker pen. Then I ironed the quilt. This was during little man’s morning nap time.

IMG_0471.JPG

During afternoon nap time, which was longer than expected, I made the binding. After several false starts with different lengths, I worked out that I needed to cut out six inch strips so that they’d end up 5.5″, like the blocks.

IMG_0473.JPG

Picking up tonight, I’ve sewn the strips together.

IMG_0474.JPG

IMG_0475.JPG

I’ve then trimmed off the excess wadding and backing. I did this with scissors first, then the rotary cutter.

IMG_0476.JPG

IMG_0477.JPG

I’m not sure it’s as square as it could be. I confirmed this by stitching a 1/4″ seam round the edge of there quilt. Which I should’ve done before trimming. Oops.

I was about to attach the binding, when I got in a pickle. I’ve made single binding but was reading instructions for double binding. So, I’ve packed up for the night. Fresh eyes tomorrow. I’ve got two fairly free days so hopefully I’ll finish it in time.

And so to bind

Finished quilting the stars, took a lot longer than I thought. Thread kept breaking on me. Anyway, here it is.

IMG_0470.JPG

A bit crumpled after being rammed under the sewing machine. I’m looking forward to washing the fabric marker off.

Off to bed now, leaving the scary bit (for me) – the binding – til tomorrow.

Quilting has begun

As time is of the essence I cheated/took a shortcut and instead of basting my quilt using the special pins which arrived last week, I opted for spraymount instead.

I did as instructed in The Quilter’s Bible and sprayed the wadding in two halves. First to attach it to the backing.

IMG_0462.JPG

And then the same again to attach the quilt top.

IMG_0463.JPG

Easy peasy, although a bit sticky.

After some deliberation, I decided to start quilting by outlining my squares using the ‘stitch in a ditch’ method. I’m still not sure if that’s what was done on the quilt I’m copying; the instructions don’t say and I change my mind each time I look at the picture of the finished quilt.

Anyway, stitch in a ditch. This is where the stitching is supposed to sit in the seam so you can’t see it, but still producing the quilted effect. Hmmm. I think I’ve mostly straddled the ditch, occasionally dipping in to it.

IMG_0466.JPG

Tonight, I’ve quilted the inside border, which I’d marked up with fabric marker, making the lines really easy to follow.

IMG_0467.JPG

Impatient as I am, I wanted to carry on and do all the stars too, but I’m flagging so decided to leave them til tomorrow. Couldn’t resist sneaking one in though.

IMG_0468.JPG

Although it looks like I’m working in the dark, I’m not. Perhaps the lighting in our conservatory isn’t strong enough though.

Pretty pleased with how far I’ve got today. Hoping to finish the quilting tomorrow, then it’s the dreaded binding. I have a horrible feeling I don’t have enough fabric leftover to make my scrappy binding. Then what to do?

Mission impossible?

I’m on a big push now to try and get this cot quilt finished by Saturday. Thought if I wrote about it on here, that should motivate me.

Tonight, I’ve cut out the wadding and backing. Somehow, I managed to cut the wadding too short in length, but, fortunately, I bought enough for two quilts so I cut another bit to size.

The wadding has now ended up larger than the backing. I think I’ve also made a major rookie error. I read that the backing and wadding should be 3-4 inches bigger than the quilt top. So I measured the quilt and added 4 inches on to each measurement. In hindsight, I think that should’ve been 8 inches. Sad face. So not sure I’ll have enough of either now. But I’ll soldier on tomorrow and being the basting. Then quilt and hope for the best!

Here’s the backing with quilt top on top.

IMG_0459-2.JPG

Here’s the backing on the wadding, to show that the wadding is bigger, width wise.

IMG_0460-0.JPG

And here’s all three.

IMG_0461-2.JPG

I realise that they aren’t in the right order. Hopefully I haven’t made a right hash of it before I’ve even begun. Maybe 9pm isn’t the time to start doing these things.

Crafternoon

Having finished my second pair of shoes, tidied all my craft stuff away, done the washing up and then Day 23 of the 30 day ab challenge (95 sit ups, 140 crunches, 55 leg raises, 85 second plank!!!) I’m now having a well-earnt rest on the sofa.

Today was a special day, a Crafternoon day! This is basically when some of my current and former work colleagues get together, eat food and a little craft gets done too. I’m trying to work out when we had the first Crafternoon, I think it was probably 2010.

A few of the girls at work used to go for coffee on a Wednesday lunchtime, we called it Coffee Wednesday. Original. We were celebrating reaching the halfway point of the week. We’d usually go for a pub lunch on a Friday too to celebrate the end of the week. Anyway, I think one of the girls asked if one of the other girls, a very clever crafter called Emily, would show her how to knit. She ended up teaching about three of us to knit. So a Coffee Wednesdays became Crafty Wednesdays. I’m so grateful for Emily for teaching me how to knit. It’s something I was never taught as a child; I feel I missed out! The first thing I made was a baby blanket for my yet to be born niece, Adelaide. She’s now 5, and since then I’ve made another 5 Big Bad Baby Blankets. They’re so easy to make, but, on average they take me about 3 months to knit!

Another colleague, Christin, another very clever crafter, taught Emily how to crochet and she’s crocheted many blankets since. One of which I was lucky to receive as a wedding gift and is one of my very favourite possessions. I’ll share it with you another time. Meanwhile, Christin has moved to the States and runs art classes alongside all her other crafting activities. You should check out her website. We were hoping to Skype her today, but timings didn’t work out.

As it proves difficult finding a weekend date everyone can make, we usually end up having only one or two Crafternoons a year. We always have a Christmas one, even if it’s in November. There’s usually a theme to the food; so far, we’ve done: Spanish, Greek, Italian. Today’s theme was English garden party. Basically sandwiches and cakes. I forgot to photograph the food before we started demolishing it. So here’s us (slightly staged with our crafts).

IMG_0453.JPG

Amazingly, Emily and I managed to get our babies to sleep at the same time and we had a glorious 45 minutes of uninterrupted craft time. Emily did 3 rows of crochet, which she says is more than she usually manages in an evening.

IMG_0454.JPG

Lucy had a go at loom bands and also sewed a couple of badges onto her Guides camp blanket.

IMG_0455.JPG

I failed to get a picture of Kayleigh making loom bands. Kayleigh and a friend have been showing off their wares (which include magic wands, shadow puppets, hair clips and bibs) at various craft fares. Have a look at their Facebook page.

Meanwhile, I started a second pair of baby shoes as I wasn’t happy with the pair I made the other day. I finished them tonight. They were better and didn’t take as long. But, unfortunately, one shoe was bigger than the other.

IMG_0456.JPG

And, Sleeping Beauty-style, I’d manage to prick my finger and get blood on the sole of one of them.

IMG_0457.JPG

Fortunately, one of the shoes I made earlier in the week is a better match in terms of size. All I need to do now is buy some ribbon and attach it.

IMG_0458.JPG

Sorry for the epic-ly long post, with not many pictures. I’m exhausted just writing it. Back to the quilt tomorrow. Maybe.

These shoes aren’t made for walking

Some friends of ours had a baby girl on Tuesday and I was immediately struck down with a severe case of new project-itis. What could I make? And quickly? I was aiming to make something there and then that evening. After a Google search I found a pattern for baby shoes. Great, I thought, I can even use leftover fabric from some of the bunting I made.

I cut my pieces out as per the instructions.
20140807-215932-79172052.jpg

Then I pinned and sewed the outside tops to the inside fabric. I cut the excess inside fabric off after sewing, as per the guide. Good timesaver. Then clipped the corners and curves.

20140807-223109-81069238.jpg

20140807-223110-81070235.jpg

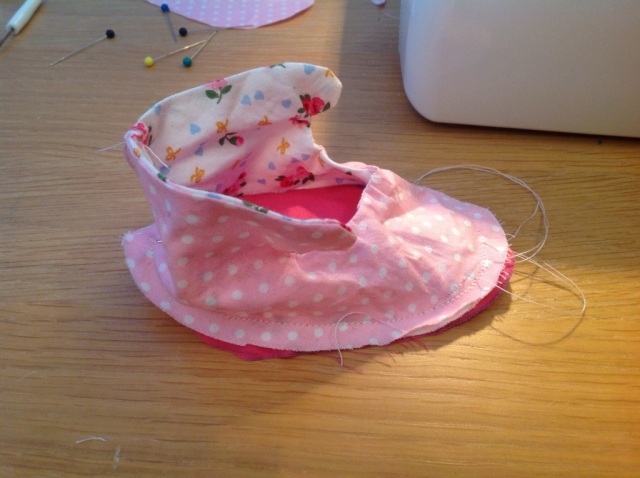
I then turned out the tops of the shoes and pressed them.

20140807-220438-79478517.jpg

This is where it started getting confusing for me. Not helped by fact that the spelling, grammar and general flow of the instructions was pretty hopeless. I’m easily distracted by bad spelling and grammar. Oh the perils of being an Editor. Finally, I worked out what I had to do next (open up back edge of shoe and put right sides together, sew, then fold outside over so the seam is hidden. Voila. A bit of pleating occurred, but hey ho.

20140807-220648-79608903.jpg

At this point, it was time for bed. So much for a ‘quick’ project. My husband had arrived home at 9:30pm to find me ‘in the zone’. No dinner prepared. You know what it’s like when you start something new, well if you’re impatient like me and want to finish it now, now, now!

I picked up yesterday with attaching the soles. This is where it got really confusing for me. Thought I’d got it sussed, but the seams were far from hidden, which is what they were supposed to be.

20140807-221409-80049545.jpg

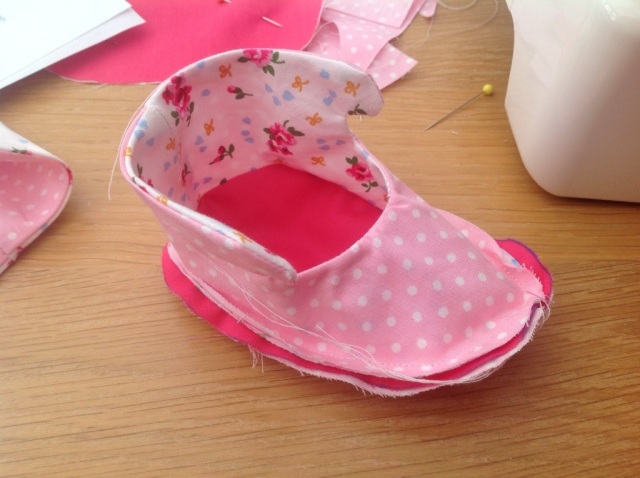
Trying again with a different fabric, I was finding the soles were coming up much too big to ‘ease in’ without ‘access’ (excess!!) fabric.

20140807-221528-80128481.jpg

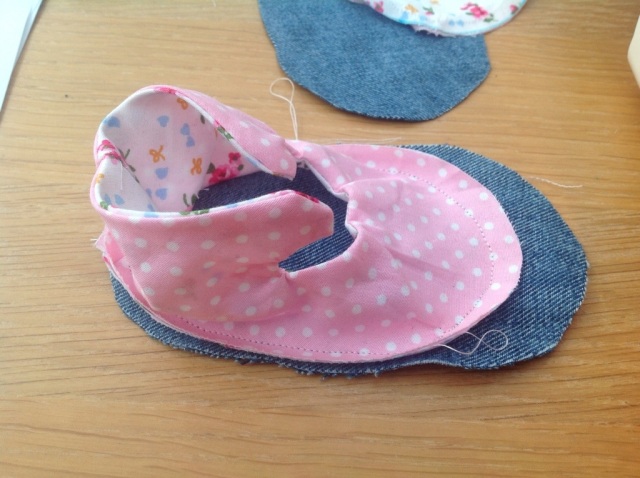
The denim wasn’t working for me. So I went back to the bright pink fabric, chopped a bit off the top to make a better fit and, after many wrong turns, I managed to attach the outside and inside soles.

20140807-221645-80205354.jpg

Having left a hole in the toe, I then had to turn the shoe out through the hole, sew along the seam and trim off the excess fabric.

20140807-221749-80269392.jpg

20140807-221750-80270351.jpg

20140807-221751-80271328.jpg

And this is what I ended up with. A very wonky shoe!

20140807-221850-80330021.jpg

My second one was a little better.

20140807-221913-80353926.jpg

But they’re not a great match.

20140807-221948-80388303.jpg

I think I’ll keep these for a dolly/teddy to wear. So I haven’t bothered attaching the ribbon. Now I know what I’m doing, I’ll have another go at making the shoes and, hopefully, it’ll be much quicker next time round. It doesn’t look like we’ll get time to meet Bethany (the intended owner of these shoes) til next week now, so I’ve got time to have another go.

And then, I can’t ignore it any longer, I must get back to my quilt. Especially now these have arrived.

20140807-222317-80597970.jpg

Is anyone else guilty of putting off projects they’re a bit nervous about by creating new projects? I can’t be the only one. Next weekend I’m seeing my niece, so it’d be great to hand over the finished cot quilt. I don’t really want to hang on to it til Christmas. Far too impatient for that. However, that means I do need to get my skates on, which is difficult when looking after a nearly 10-month old baby all day. Wish me luck!

Seeing stars. And diamonds.

I’ve finally come up with a star shape I’m happy with – it took many attempts.

20140802-143702-52622629.jpg

I traced it onto a piece of cardboard to use as my stencil. I’ve now marked on all the stars I need to quilt. I’ve then marked on the crosshatching/diamonds on the inner stripy border.

20140802-143851-52731015.jpg

Next up is cutting my backing and wadding to size, then assembling the quilt sandwich. Any tips for doing this? I’ve got some spray mount. What do you use?

Being a total novice I consulted one of my many quilting books and it mentioned quilting in the ditch as being a good beginner technique. From looking at photos of the quilt I’m copying, I’m not sure if this technique was used or not. I think it was …

20140802-144158-52918122.jpg

Am I right? Should I use quilting in the ditch to outline the squares and borders? Rather than just doing the stars and cross hatching? Advice appreciated!